

This blog was written by Cheik Kone with Fahad Abdul as a contributor.
The Importance of Project Tasks
In today’s fast-paced business environment, accelerating sales cycles is crucial for maintaining a competitive edge.
One effective way to achieve this is by leveraging Power Automate and Microsoft Dynamics 365 Project Operations to automate the creation of project tasks. This low-code approach not only enhances project planning but also builds trust with clients by providing clear and accurate project scopes early in the sales process. Let’s review how you can streamline your sales cycles and improve project outcomes.
Project tasks are the backbone of any project. They enable the ability to break down complex projects into manageable steps. They are essential for:
- Planning Work: Defining the scope and sequence of tasks.
- Assigning Resources: Allocating the right resources to the right tasks.
- Tracking Progress: Monitoring the completion of tasks to ensure timely delivery.
In the context of sales, accurately scoping and estimating work is key to closing deals faster. D365 Project Operations enables organizations to define tasks, timelines, and resource requirements early in the sales cycle, fostering confidence and trust with clients.
Leveraging Project Templates
Incorporating best practices when creating and using project templates can significantly enhance the efficiency and effectiveness of your project management processes. Here are some key recommendations:
Standardize Task Structures
- Consistent Naming Conventions: Use clear and consistent naming conventions for tasks to ensure everyone understands what each task entails.
- Uniform Task Breakdown: Break down tasks into manageable pieces consistently across all templates. This helps in maintaining uniformity and ease of understanding.
Define Clear Dependencies
- Task Dependencies: Clearly define dependencies between tasks to ensure a logical flow of work. This helps in identifying critical paths and potential bottlenecks.
- Resource Allocation: Assign resources based on task dependencies to avoid overloading any single resource and to ensure smooth project execution.
Set Realistic Timelines
- Accurate Estimations: Base your task durations on historical data and realistic estimations. Avoid overly optimistic timelines that can lead to project delays.
- Buffer Time: Include buffer time for tasks to account for unforeseen delays and ensure project timelines are met.
Prioritize Tasks
- Task Prioritization: Assign priorities to tasks to help teams focus on the most critical activities first. This ensures that essential tasks are completed on time.
- Bucket Tasks: Group tasks into buckets based on their priority and type. This helps in organizing tasks and making it easier to manage them.
Regularly Update Templates
- Continuous Improvement: Regularly review and update your project templates based on feedback and lessons learned from previous projects. This ensures that your templates remain relevant and effective.
- Version Control: Maintain version control for your templates to track changes and ensure that teams are using the most up-to-date versions.
Customize for Different Project Types
- Template Variations: Create different templates for different types of projects (e.g., Construction, IT Development, Non-IT Development). This ensures that each template is tailored to the specific needs of the project type.
- Field Customization: Customize fields such as ‘Template Type’ to make it easy for users to select the appropriate template when creating a new project.
Automating Project Task Creation with Power Automate
Leveraging Power Automate to further streamline the process and dynamically apply your preferred project template to new projects. Here’s how:
- Define your Trigger: Set the flow to trigger when a new project is created, and a template type is selected.
- Get your Template information: Use a list row query to retrieve the project template record based on the selected template type.
- Leverage an Action (msdyn_CopyProjectV3): Actions in Power Automate empower users to accomplish more complex tasks with a low-code approach, bridging the gap between simple automation and advanced functionality. By leveraging these capabilities, organizations can enhance their efficiency, flexibility, and scalability, all while reducing costs and fostering collaboration. In this case, we are going to leverage the msdyn_CopyProjectV3 action to apply the template to the new project.
Putting it All Together
In D365 Project Operations, when you open a project record and click on the ‘Copy Project’ ribbon button, a brand-new project will be created and the WBS (Work Breakdown Structure) of the new project will be a copy of your source project. This, however, is a manual process. In real world scenario, we might want to automatically create project tasks based off a template.
Let’s consider a business scenario for a construction company. We are going to create a project template for Construction schedule. We will go through how we can automate it in two parts, first we will create a project template which will have a project task structure and then we will build a power automate flow which will apply the project template to the project whenever a new project is created.
Create a Project Template
- In order create Project tasks based on a Project template, first we need to a project template
- So, let’s start off by creating a new Project template
- Open the Project Operations model driven app and from the sitemap select ‘Project’ and click on create ‘+New’ to create a new project record
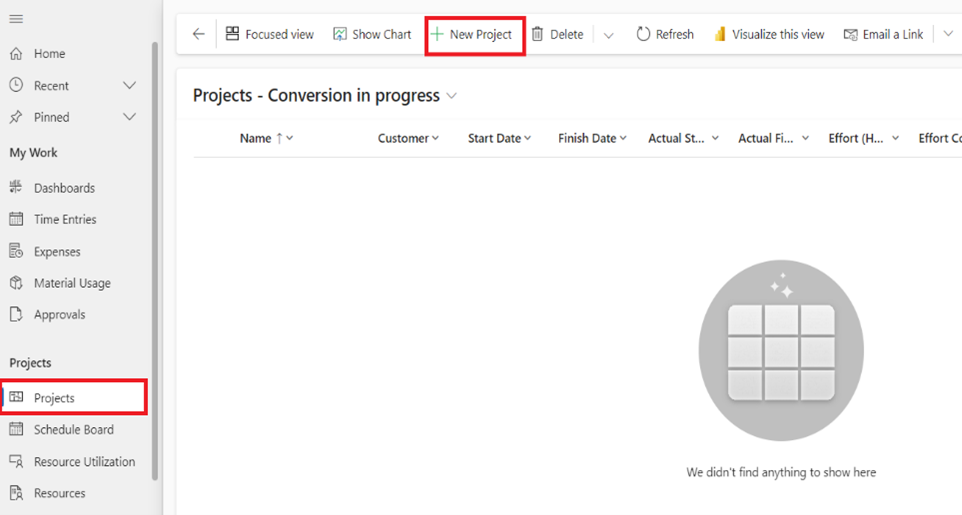
- Create your project template as per your requirements, in this example we are going to create a project template for Construction schedule
- Give your template a name as ‘Construction schedule’
- Click on the Tasks tab and add relevant tasks in the WBS
- We will be adding the below Project tasks in the WBS for this example
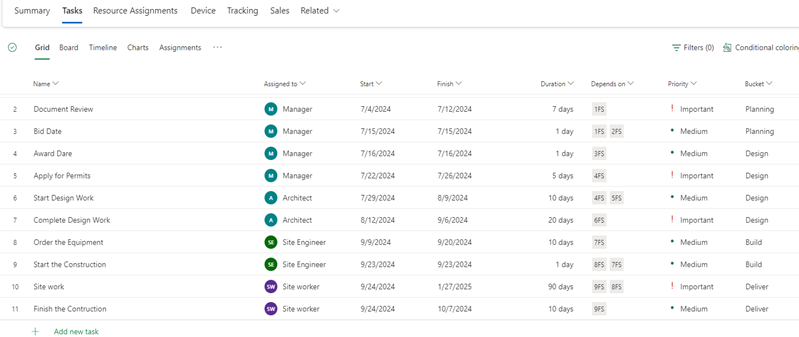
- Notice that we have assigned each task to a generic resource, we have set the start and end date and we have also defined if there are any dependencies between the tasks and finally, we have also set the priorities and divided them into different buckets
- Now if you click on the ‘Board’ tab, you can see that tasks are properly divided and placed in designated buckets
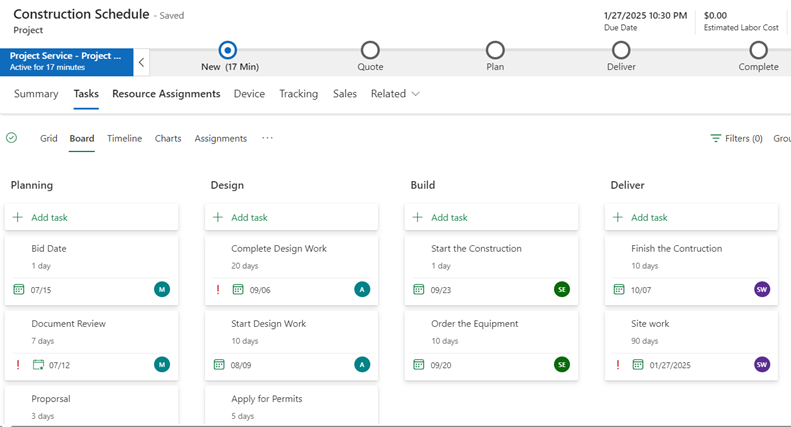
- To differentiate a Project template from an actual Project, lets create two option set fields
- Is Template (values –> Yes/No)
- Set the default value to No and hide this field on the form–> this will ensure only developers can access this field when they are building project templates, only they can set this field as ‘Yes’
- Template Type (values –> Construction schedule, Product Development (IT), Product Development(Non-IT)etc.,)
- Is Template (values –> Yes/No)
- Navigate to make.powerapps.com, create/open a solution. Add the Project table to the solution and create the above 2 fields and place them on the form.

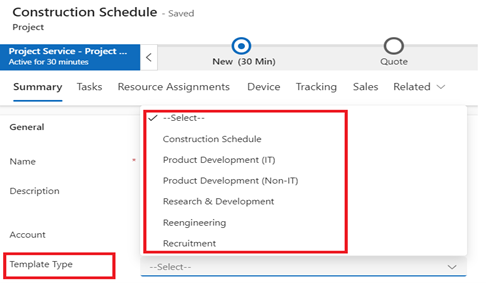
- Template type field will also be used by the user to select the template that he wants to apply when he creates a new project
- Switch back to the Project operations MDA and open your project template record
- Set the Template type field as ‘Construction Schedule’ and set the Is Template as ‘Yes’ and save your changes. Now those two fields should be looking like this


- Your project template is now ready.
- Now when a user creates a new project and selects the Template type as ‘Construction Schedule’ , let’s build the power automate flow to apply this template to new project created by user
Flow Designer Logic
- Trigger: When user creates a new project and selects the template type on Project (Construction schedule, Product Development(IT) etc.,)
- Initialize a variable: Save the Template Type from the Trigger project
- List rows: Get the Project template record. We will need the GUID of the Project template in the subsequent steps
- Table name: Projects
- Fetchxml query:
<fetch top="1">
  <entity name="msdyn_project">
    <attribute name="msdyn_projectid"/>
    <attribute name="msdyn_subject"/>
    <attribute name="createdon"/>
    <order attribute="msdyn_subject" descending="false"/>
    <filter type="and">
      <condition attribute="hsl_istemplate_bln" operator="eq" value="1"/>
      <condition attribute="hsl_templatetype" operator="eq" value
      {Templatetype_Variable}"/>
    </filter>
  </entity>
</fetch>- Compose: Save the GUID of the Project template record
@{first(body('List_rows')?['value'])?['msdyn_projectid']}- Perform a bound action – msdyn_CopyProjectV3:
- Table name: Projects
- Action name: msdyn_CopyProjectV3
- Row ID: GUID of trigger project (from step 1)
- msdyn_project msdyn_projectid: Outputs from the compose action to get the Project template GUID (from step 4)
Power Automate Flow
- Navigate to make.powerapps.com, create/open a solution.
- Create a new cloud flow, give it a name – ‘Project task creation based off of a template’
- Set the trigger as whenever a new record is created
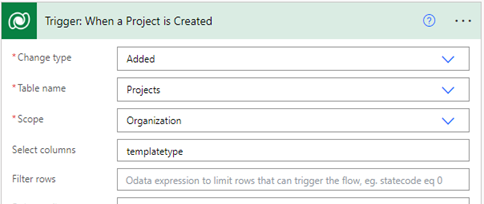
- Initialize a variable to save the template type of the Trigger project. In the value field, select the ‘Template type’ from the dynamic content. Template type (values –> Construction schedule, Product Development (IT), Product Development(Non-IT)etc.,) is a custom field we have created in the above steps

- Now let’s get the GUID of the Project template. In the fetchxml query notice that we have defined two conditions:
- Is Template == Yes
- Template type == Value from the Template type variable from step 4
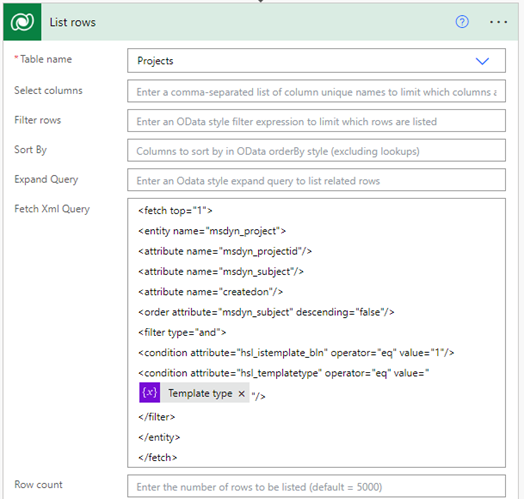
- Now that we have the Project template record, lets write a compose action to save its GUID
- Add this in the input: @{first(body(‘List_rows’)?[‘value’])?[‘msdyn_projectid’]}

- Add a step to perform a bound action and set the below parameters
- Table name: Projects
- Action name: msdyn_CopyProjectV3
- Row ID: GUID of trigger project (from step 3)
- msdyn_project msdyn_projectid: Outputs from the compose action to get the Project template GUID (from step 6)


- Bound action will take around 40-60 seconds to complete, post that you should be able to see project tasks created in your trigger project.
Testing the flow
- Open the Project operations MDA
- From the sitemap, select the project and create a new project
- While creating the project, select the Template type as ‘Construction Schedule’
- Hit Save
- Wait for a minute and then click on the tasks tab, you should be able to see the Project tasks created as per the Construction Schedule’s Project Template.
Once you have completed these steps, you can now test your flow by creating a new project and filling out all required fields including the template type you have configured earlier. After saving the record, check the tasks tab and after the bound action completes its run, the new project tasks are created according to the template.
While this approach significantly speeds up project setup, there are a couple of limitations to keep in mind:
- The msdyn_CopyProjectV3 action can only be applied once per project.
- The action must be performed within a minute of the project’s creation.
Whether you’re a seasoned developer or a business user, bound or unbound actions open up a world of possibilities for automating and optimizing your workflows.
Accelerate Your Sales Cycles with Hitachi Solutions & D365 Project Operations
By leveraging D365 Project Operations and Power Automate, you can significantly accelerate your sales cycles and improve project planning accuracy. This approach not only enhances internal efficiency but also builds stronger client relationships through clear and reliable project scoping.
The Hitachi Solutions team has extensive experience helping customers leverage the Microsoft platform to transform their business. Contact us today to learn more about how we can help!
Additional Tips!
- Experiment with different project templates and see how this low-code solution can transform your project management and sales processes.
- For more detailed steps and examples, refer to the official Microsoft documentation on developing project templates with the Copy Project action: Develop project templates with Copy Project | Microsoft Learn


