
How to Count Associated Records in Dynamics 365 for Sales using Microsoft Flow


Building solutions to complex customer requirements in D365 for Sales is a challenging and rewarding experience.
During one of my recent projects, the client outlined that in their business process for customer service, accounts are assigned a retention specialist who works with an account rep to evaluate the level of service provided to that account. Performance evaluations are completed at various times throughout the year and as these evaluations are completed, a method is needed to count the number of evaluations completed in the current year and present that number in a field on the customer record as a running total of the completed evaluations to date for that account.
Breaking down the requirements we have:
- The ability to create and complete evaluation forms for clients to assess their satisfaction with my customer’s products and services.
- The ability to complete multiple evaluations for a client over the course of a year.
- Clients will have a customer retention specialist that will facilitate the evaluation to provide a positive user experience.
- 2 times a day have an automated process that will tally up completed evaluations for the current year for each client account and store that number on the client account record in D365 for Sales
- Evaluations are completed using a custom entity that has a N:1 relationship with the Account
- The account has a custom integer field that will hold the number of completed evaluations
As I thought about the various tools available to me for a job like this, my first thought was the roll-up calculation fields available in Dynamics, but they don’t allow you to filter based on a date range. Custom scripting is an option but not future proof as codebase often gets updated over time. Ultimately I decided to use Microsoft Flow since it is available out of the box with D365 and already contains the connectors and triggers I need to meet the requirements of the solution. Microsoft Flow is a service that helps you create automated workflows between your favorite apps and services to synchronize files, get notifications, collect data, and more.
Here are the steps used to create the solution using D365 CE and MS Flow
Planning out the logic
I always like to write down a rough order of what the logic needs to be to help guide the actual steps in the flow as I start building it
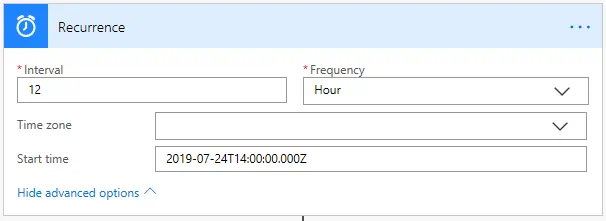
- Use a schedule-based flow that will fire every 12 hours
- Determine the current year and establish the first day of the year
- Initialize a variable that will store the count of completed evaluations
- Retrieve all the accounts where retention specialist field (lookup to a user) is NOT NULL (limits number of records processed)
- For each account, retrieve the service evaluation (custom entity holding evaluation results) where Status Reason = COMPLETED AND EVALUATION DATE IS NOT NULL (we only want completed evaluations to be counted)
- Clear out the counter from step C to make sure it is 0 as we recurse through the returned accounts
- For each service evaluation, check to see if the evaluation date is >= current year from step B
- If evaluation date check is true, then update the counter from step C and increment by 1
- Go back to step G until there are no more completed evaluations for this account
- Update the # Evaluations Completed field (custom integer field) on account entity for this account
- Go back to step E until all Accounts have been completed
- END
Building the Flow
OVERVIEW OF FLOW
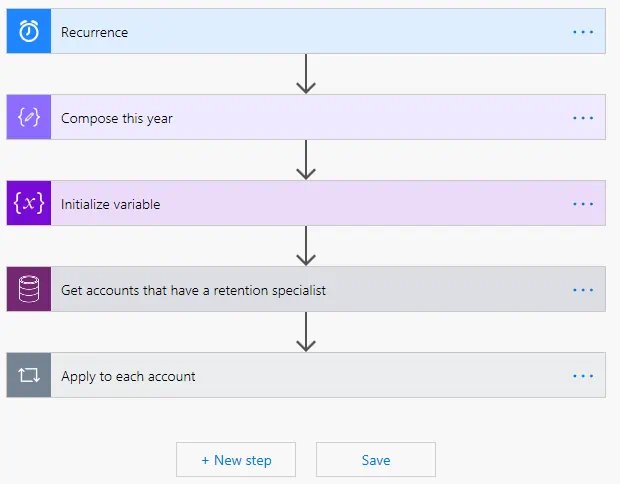
RECURRENCE STEP
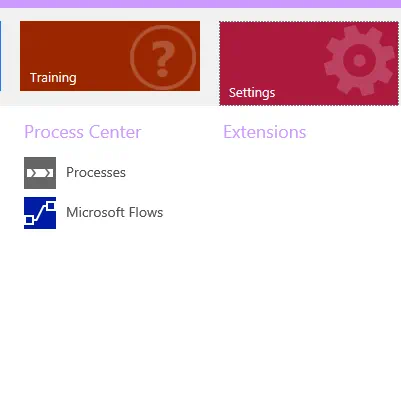
When you first create your new Flow, you’ll need to choose the type of Flow to create. After signing into your Microsoft account where your D365 instance is, you can go to Settings > Process Center > Microsoft Flows and see all your Flows or create a new one.
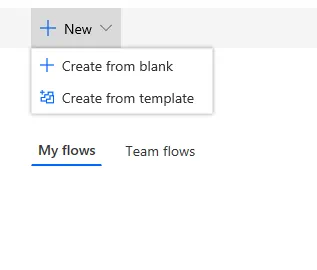
Create a new flow by choosing New and Create from blank
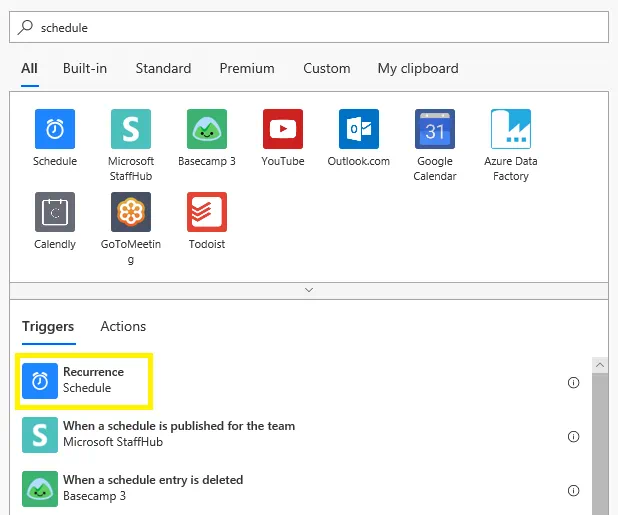
Next you will pick a trigger. In this case we want to pick a Scheduled Recurrence trigger. You can just type scheduled into the search box and you should see the Recurrence trigger appear. Click it to add it to the beginning of your flow.
Whenever I create my steps, I like to give them a name that will be logical and easily describe what the step does. In this case our step is controlling the recurrence of our Flow. It will run once every 12 hours or twice a day which satisfies our requirement.
COMPOSE THIS YEAR

For this step we are using the Compose Data operator that allows us to easily create a fixed value to be used in formulas. The input formula gets the current year from the utcnow() function, and then we are simply concatenating it to make the first day of the current year that we will use later for comparing. So, the result here will be 2019-01-01 since this was written in 2019. Each year moving forward, the job will calculate the new current year so our job will only count evaluations for the current year which satisfies our requirement.
INITIALIZE THE COUNTER VARIABLE
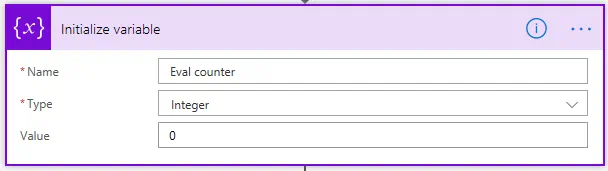
For this step we are using an Initialize Variable operator so that we can create a new variable that will hold our count of evaluations for the account we are working on. We simply give it a name Eval counter, pick the type Integer and set the initial value to 0.
GET ALL THE ACCOUNTS THAT HAVE A RETENTION SPECIALIST
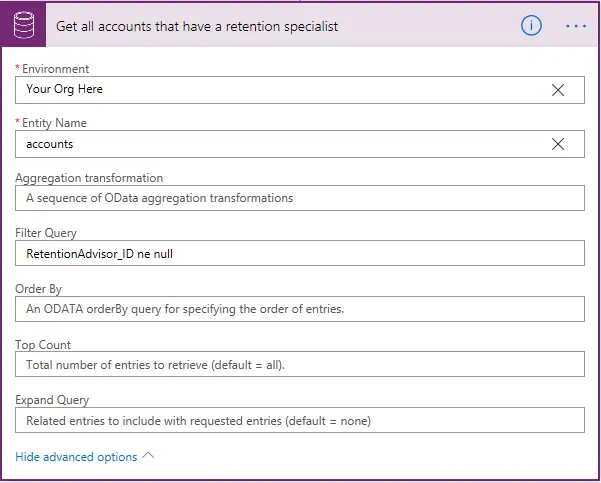
Here we are using a Common Data Service “List Records” action to pull all the accounts that have a value in the RententionAdvisor_ID field. This is the lookup field on the account for the user that is designated as the Retention Specialist for that account. You’ll notice that the Filter Query is simply lookup field name ne (Not Equal) null ***Note, there are many different ways to access and create Flows. If you are using a different method you may not see the Common Data Service actions you need. Microsoft is working on consolidating the interfaces into a common area.
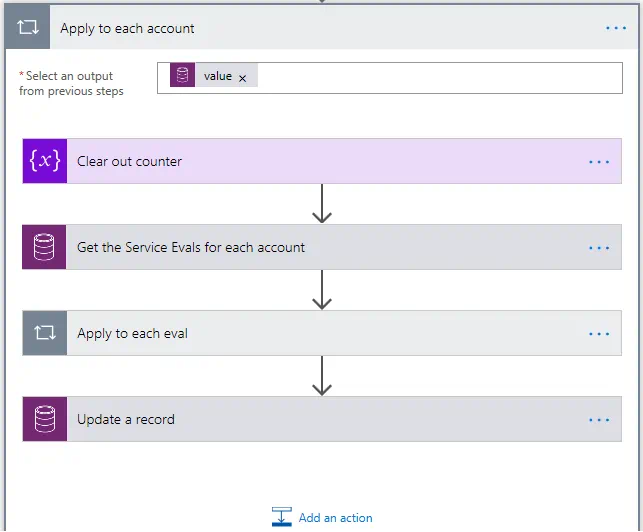
APPLY THESE STEPS TO EACH ACCOUNT RETURNED
When you select your next step, Flow is smart enough to know that you want to perform an action on multiple account records that were returned from the list records step and it automatically creates an “Apply to each” container so that you can simply create the steps that will be performed for each account returned.

So for each account returned (value from the account list step), we will Clear out the counter, get the number of completed evaluations, apply some logic to each evaluation to see if it is completed and meets the date criteria, increment the counter, then finally update the counter on the account. Let’s look closer at each step.
CLEAR OUT THE COUNTER
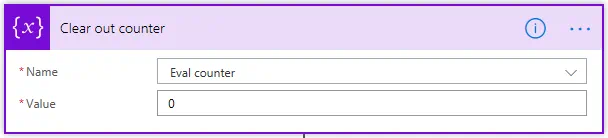
Here we are using an initialize variable operator to quickly clear out our variable to make sure there are no left-over values from a previous run. We give it the name of our variable and the value.
GET THE SERVICE EVALUATIONS FOR THIS ACCOUNT
Here we create another Common Data Service List Records action so that we can pull back all the related evaluations for the account we are currently working with.
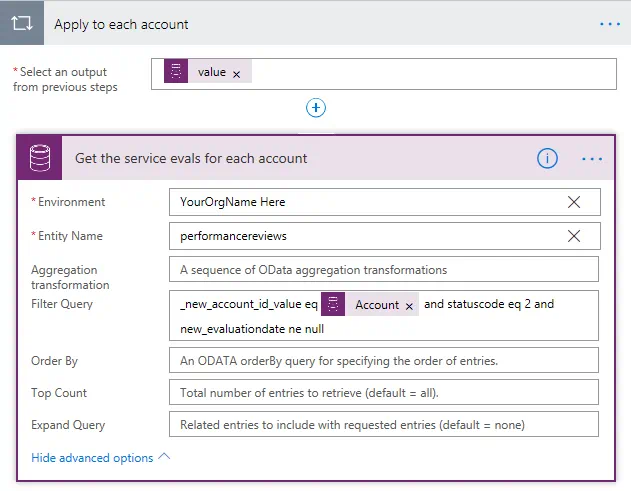
Configuring this step is a little tricky on the filtering, but you will see it is not that bad once you know a few tricks. Add your Organization name like we did before, then the logical/schema name of your entity. In our case it is new_performancereviews. Then we get to the filtering. Since we want to return evaluations related to the current account, we need to add the relationship name of the account lookup field. You can grab this from your customization field details of your new_perfromancereviews entity. In our case it is new_account_id but you will notice that for Flow to pull the GUID of the related account we need to add an underscore to the beginning as well as an _value at the end. That is VERY important. Then we add the eq (equals) and the token of our Account (from our list account step) and statuscode eq 2 (Completed) and new_evaluationdate ne null. We want completed evals and need to make sure that the date of the eval is not null just to be safe.
The Account token is added using the “Get dynamic content” feature. Very handy for pulling values from other steps into your formulas. It is contextual so you will only see values available for the field you have your cursor in.
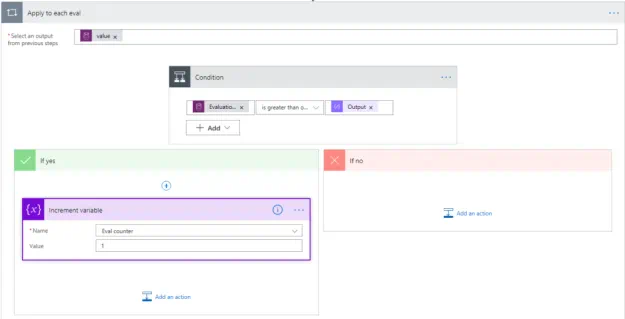
APPLY TO EACH EVALUATION
Once again since we are adding an action after a list step, Flow gives us another “Apply to each” container so that we can have some steps that we will apply to each evaluation that was returned for the account we are working on. Here we are selecting the output of our evaluation list step and then we are adding a condition step so that we can test each evaluation to see if the evaluation date is greater than or equal to our date that we created in the beginning of 2019-01-01. If yes, we will increment our counter by 1 and then we loop over to the next eval. If not, we do nothing and loop over to the next eval. After we are done with the evals for this account, we move onto the final step.
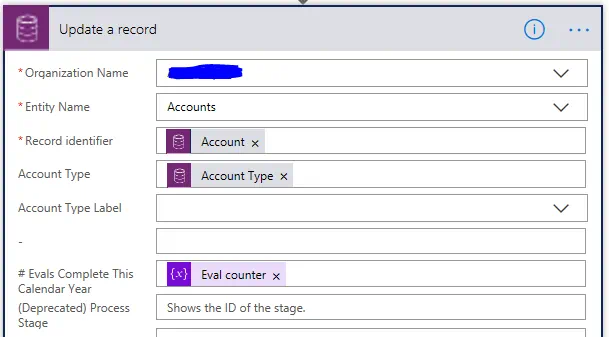
UPDATE THE ACCOUNT
We’re finally ready to update our account with the count of evaluations completed for this year to date. We have an Update Record step. Add your Organization, then entity in our case Accounts, the record identifier is the account token from our list accounts step, we are also adding the Account type, then finally in our # Evals Completed This Calendar Year, we are adding the value of our Eval Counter variable. Done! The job will now go back to the top and run again for each account until they are all processed. 12 hours later it will fire and do it all again keeping our counts updated for all accounts.
I sure hope that this helps if you were having challenges around providing a solution for something similar. As you can see Microsoft Flow and D365 provide a powerful set of tools to help you extend your D365 application without needing a developer and code.
Contact us to learn more about solving business needs and requirements. We love putting our experience to work for you!