DIY Visual Guide to IoT


There are many applications and disruptions that IoT (Internet of Things) devices are creating in business supply chains – such as asset tracking, inventory management, connected transportation, or even predictive maintenance!
In addition, the Internet of Things’ wide range of applications in the world today include such abilities as ‘remotely switching light bulbs on/off’, to ‘remotely sensing faults in pipelines a thousand miles away and thereby saving money and lives‘.
So, with all the excitement of IoT, you may be wondering how you can get started with IoT at a personal level. In this post, I am going to show how you can get involved in this fun technology revolution for the price of a medium mocha at your favorite coffee shop. The same coffee shop might in fact be using IoT to offer you frappes in summer and pumpkin spice lattes in fall!
This post will motivate you to put on your DIY hat – and it is purposely kept at mid- to high-level detail to help readers become more familiar with common IoT terms and concepts.
IoT, Functionally Speaking
There are three main aspects of IoT:
- Things: physical hardware devices, actuators, controllers, switches, and many more. This is where the interactions between the physical world and digital signals take place.
- Internet: hubs, data streams and data storage, processing, virtual machines, cloud servers and many more. This is the central part of IoT that enables access from across the world.
- Analytics: analyses, insights, visualizations, stories and numbers, and so on. This is where human interactions with technology happens.
Here is a diagram of IoT.
Our Setup
Now, here’s how we can start our DIY experiment. Most of the components in the diagram below are either very inexpensive to begin with (Raspberry Pi, Sense HAT, etc.) or free to start (Azure platform). Since this is a DIY version of IoT, the actual industrial implementations will probably have better/higher capacity devices, and bigger complexity services, depending on the problem being solved.

Let’s Start!
- Raspberry Pi
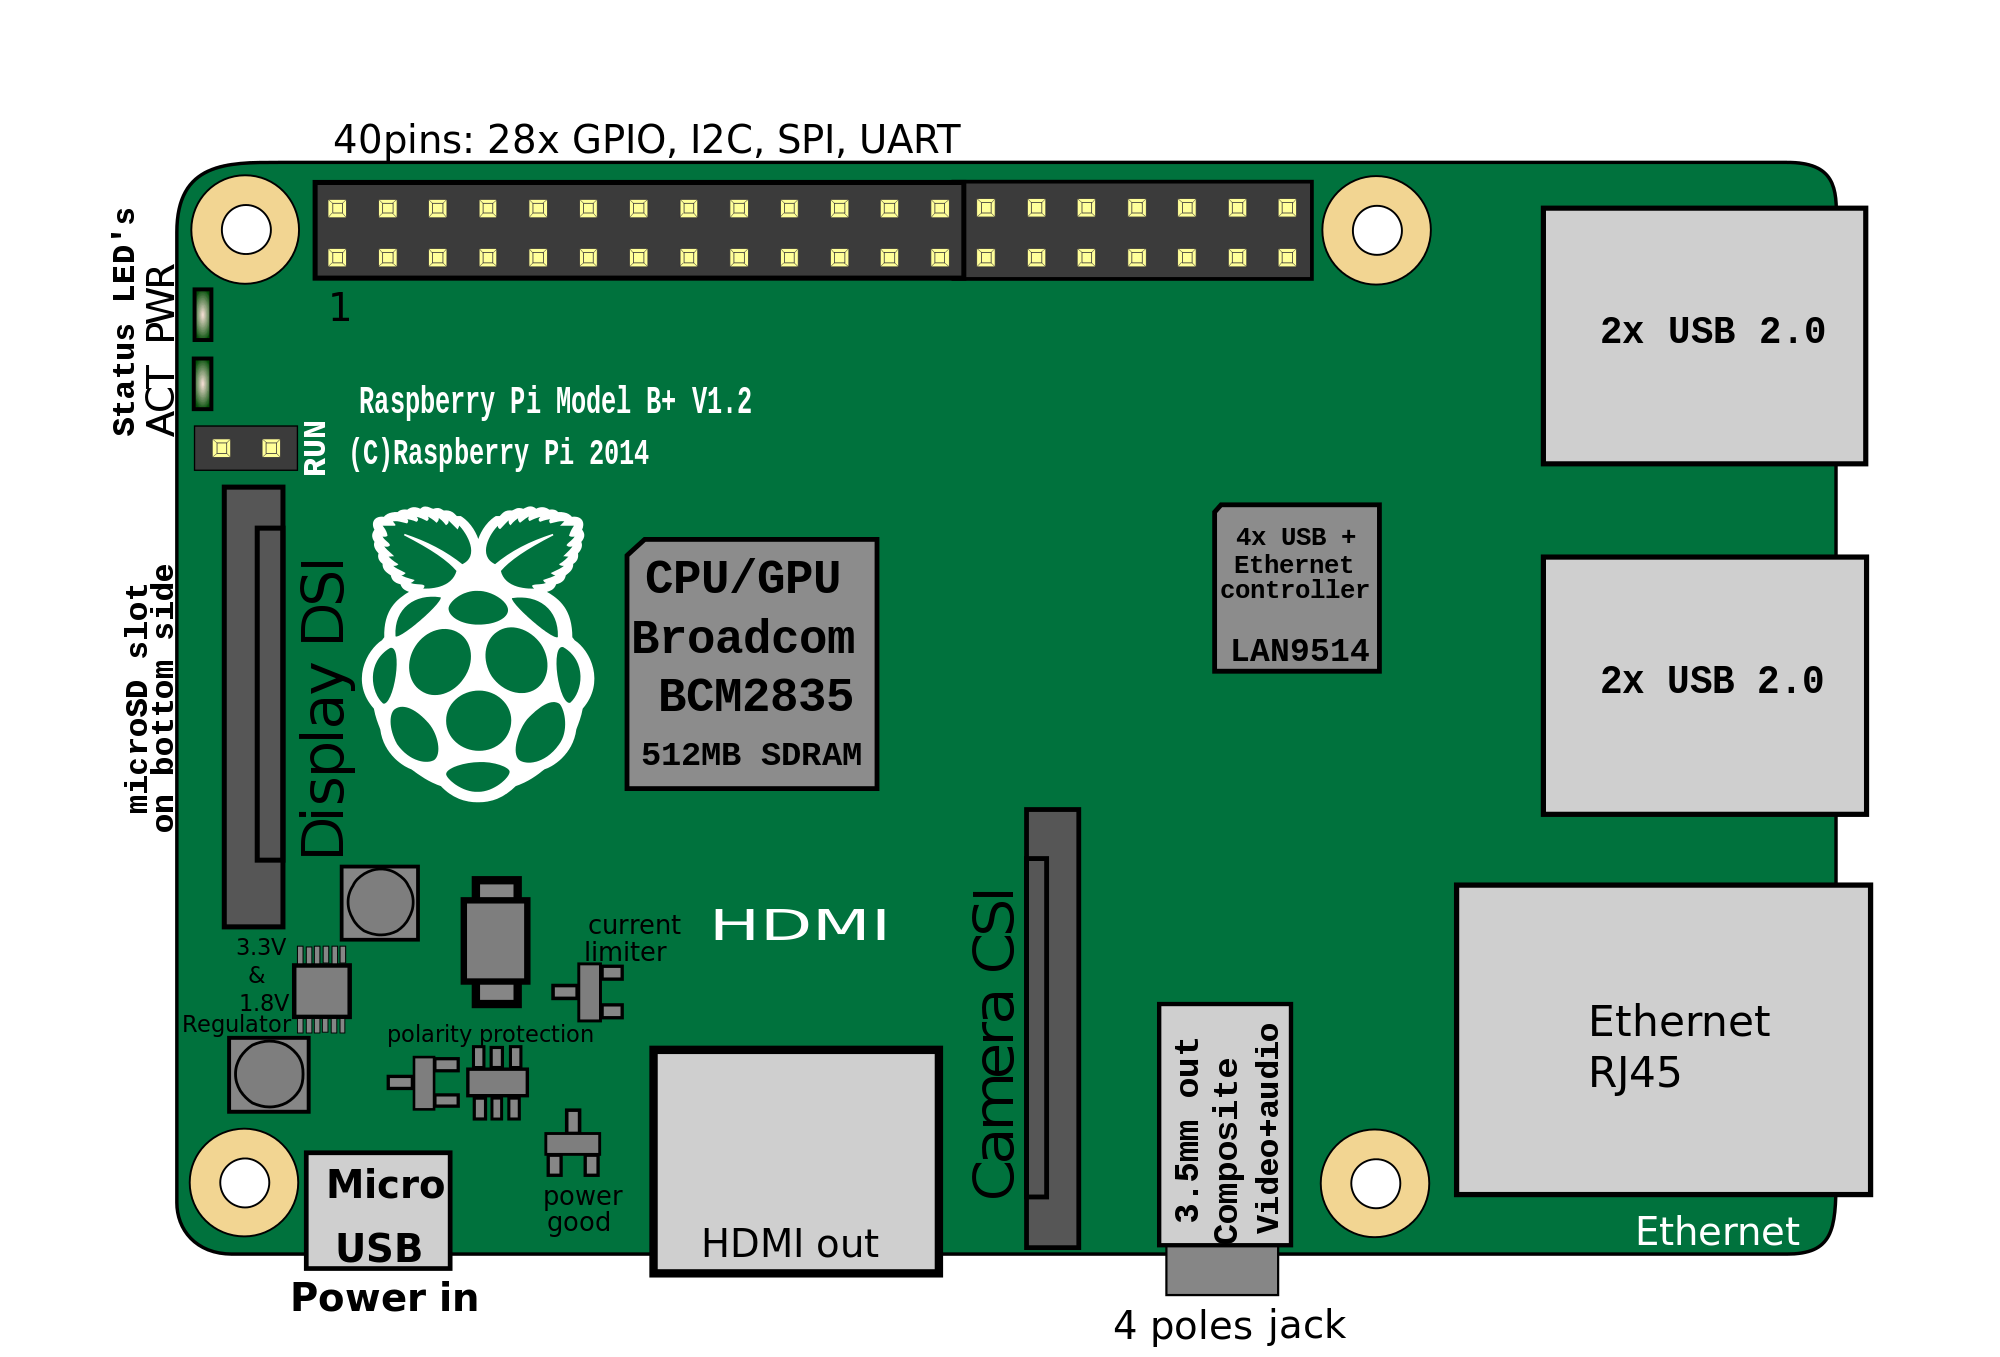
Let’s begin with the Raspberry Pi. This is an inexpensive computer which can be programmed to receive data inputs from sensors (temperature, humidity, movement, rotation, etc.), or provide control output to devices (fans, regulators, dispensers, etc.).A Raspberry Pi computer.
Raspberry Pi, or simply ‘Pi’, comes in different capacity boards like Pi zero, Pi1, Pi2, Pi3, each with increasing computational power. I used ‘Pi3’ for the IoT demo, which had ‘Raspbian‘ operating system preloaded on it along with Python3.
Here is the schematic for Raspberry Pi3 and its Raspbian desktop when connected to a screen using the HDMI Outport.
Next up is setting up Wi-Fi on the Pi board and keeping the monitor running; or use VNC viewer to see and use your Pi from just one machine. The fun begins now!
- Sense HAT
This is an add-on board specially made for Raspberry Pi’s that is full of sensors: temperature, humidity, pressure, gyroscope, magnetometer and accelerometer. Alternatively, you can run the emulator for Sense HAT natively from your Raspberry Pi. The actual hardware or the emulator, is the core part of IoT which measures (or emulates measurement) the physical quantities like temperature, humidity, etc., and also sends control signals to the hardware from the feedback side. Here is how Sense HAT Emulator looks like on Raspbian.
- IoT Hub and Generating Telemetry
Now, this is the ‘Internet‘ part of IoT! We are connecting the device to the cloud, also known as D2C for simplicity. A hub for devices is essential because it can manage millions of devices in the cloud, orchestrate the device actions or patches, and scale up or down instantly. These hubs are offered by many different companies with various different types of devices and protocols. The hub shown here is Azure IoT Hub. Login to www.portal.azure.com and create an IoT Hub from the offered services.

Once this is up and running, generate secure keys for registering your device (Raspberry Pi) with IoT Hub.

On the device, a similar key file is maintained, which when matched with the right keys from the device skeleton in the cloud, makes you ready for generating and sending data to IoT Hub. On my device this is done with the help of a Python script that connects with a cloud device and starts generating telemetry (data stream) so the IoT Hub starts receiving it. Another optional component to verify telemetry is IoT Explorer— an open source program written in Node.js that monitors the hub operations.
Here is the view on a Raspbian screen of telemetry being generated.

This is Exciting!
- Stream Analytics and Power BI
This is the next station in the journey for the data that is generated by the IoT device. As its name suggests, Stream Analytics Job from Azure Portal acts as a processing engine setting up real-time analytical computations between various streaming data inputs ( IoT, websites, media, infrastructure, etc.) and outputs (dashboards, alerts and storage). The data transformations are done in simple SQL- like language. Tasks here involve configuring inputs and outputs, and creating jobs with appropriate sampling rates and schedules.

Power BI is a business analytics tool that is used for interactive visualizations and business intelligence. Power BI is used as one of the outputs of Stream Analytics in the earlier step.
Once the data lands in Power BI, you can leverage various visual elements such as bar charts, box charts, slicers and tables for further consumption and monitoring.
Here is an example of a live dashboard created from my Raspberry Pi IoT device:

What else can we do?
We have come a long way– from setting up a Raspberry Pi with a sensor, to visualizing the data in real-time. While we were doing that, we have also paved a pathway for millions of such devices and seen how this operation can be scaled up almost infinitely. What is next is equally, or even more, exciting — using the streaming data to create machine learning models and take actions that flow back to the very device that started sending sensor data for us!
Here in this post I will only mention the next steps briefly for the sake of simplicity, and to allow the heavier topics like machine learning become their own posts.
- Machine Learning Studio
Azure ML Studio is the environment where you can build visual, end-to-end data science workflows with very minimal or no coding. It is a great tool to visualize the raw data, create experiments, code in R or Python, and even to create a web service for your experiment.
Continuing our Raspberry Pi IoT experiment: the data is stored in Azure Blob Storage as an output from Stream Analytics. The blob storage now becomes an input source directly for Azure Machine Learning Studio, where the data goes in a complete data science lifecycle as shown in the image below. Output of the model is a web service used in the next step.


- Azure Function App
This is a serverless compute application in Azure that is used for sending data back to Raspberry Pi based on business logic or based on a data science model prediction web service, and creating an event in the IoT Hub. Function App uses C# or JavaScript as programming language.

In the case of our Raspberry Pi, when Sense HAT temperature exceeds a certain threshold, an event is created in IoT Hub and triggers the Azure Function to send a message back directly to Sense HAT about the exceeding temperature. This message or alert can potentially be used by another machine that acts on releasing more coolant so the temperature goes back to normal. This is how the feedback loop is closed!
What’s next?
The DIY experiment is fairly easy to understand and a good entry point to get into complex applications in the industry. It also provides a ‘proof of concept‘ for large implementation of IoT devices and a large network of interconnected services. At Hitachi Solutions, we help clients in every aspect of the IoT cycle:
- Assessment and addressing business cases
- Designing the right IoT solution
- Analytics, Azure IoT
- Implementation of Azure IoT Hub solutions
So for the next steps, I would encourage you to visit Hitachi Solutions IoT Hub solution website or Microsoft Azure IoT website. We would love to hear from you.
Finally, welcome to the IoT Revolution!
Resources for further reading: