
How Santa Manages his Toys List with an Embedded Canvas App


Power Apps Primer: Canvas vs. Model-Driven Apps
Microsoft PowerApps is an innovative program that uses low-code software development to make it easy for business to rapidly spin up custom applications. In this article, we’ll break down canvas vs. model-driven apps — what they are, how they work, and how to use them.
Read the BlogOn the sixth day of D365mas, Santa gave to me….
Santa Claus is one of the most successful entrepreneurs in history. For many years now, he has overseen the production of toys for every single child in the world who is on his Nice List. In previous years overseeing the production of toys took a lot of time, work, and manual effort, but this year Santa is using an embedded canvas app to easily manage the production of toys for each child on his Nice list.
Santa will be using the Common Data Service to store and manage all the toys and kids’ data. Using the Common Data Service will allow him to access the Dynamics 365 data, Model-driven Apps, and Canvas apps. Also, the data will be easy to secure and manage since the data is stored in the cloud.
Next, Santa will use a Mode-Driven app to access all the information for all the children in the world as well as the toy list for each child. When navigating to a child’s profile within the app, Santa will be able to access all the child’s info as well as the toys list that shows the production status of each toy through an embedded canvas app.
Embedded Canvas App
With an embedded canvas app, we can easily design and create custom layouts using low-code or no code at all. Canvas apps create powerful visuals on a form and allow you to present a variety of sources right next to the data from the Common Data Service.
This year Santa will no longer spend an enormous amount of time overseeing the production of toys all thanks to the amazing functionality an embedded canvas app provides.
With an embedded canvas app embedded into the child’s form, Santa can easily gain access to all the child’s favorites, Location, and General Info, but he can also easily and quickly view the production status of all the toys the kid has requested. Santa can also easily update and modify the statuses from the canvas app in one location only.
Here are some of the functions that can be used within an embedded Canvas App.

Functions
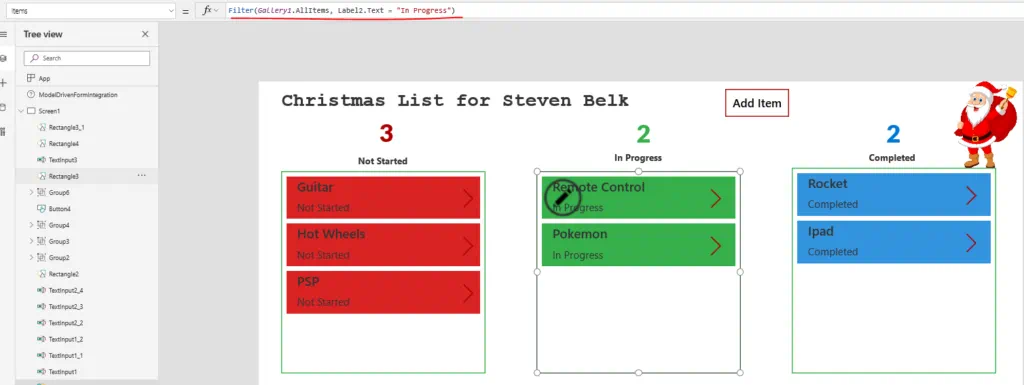
Using the Filter function, we can easily filter galleries to display what we want. For example, we can easily create a gallery to show a list of all the Toy’s list and set the visibility of the gallery to “off.” Next, we can create 3 different galleries and filter them based on the production status of the toy. The different formulas will look like this:
Filter(Gallery1.AllItems, Label2.Text = “In Progress”)
Filter(Gallery2.AllItems, Label2.Text = “Not Started”)
Filter(Gallery3.AllItems, Label2.Text = “Completed”)
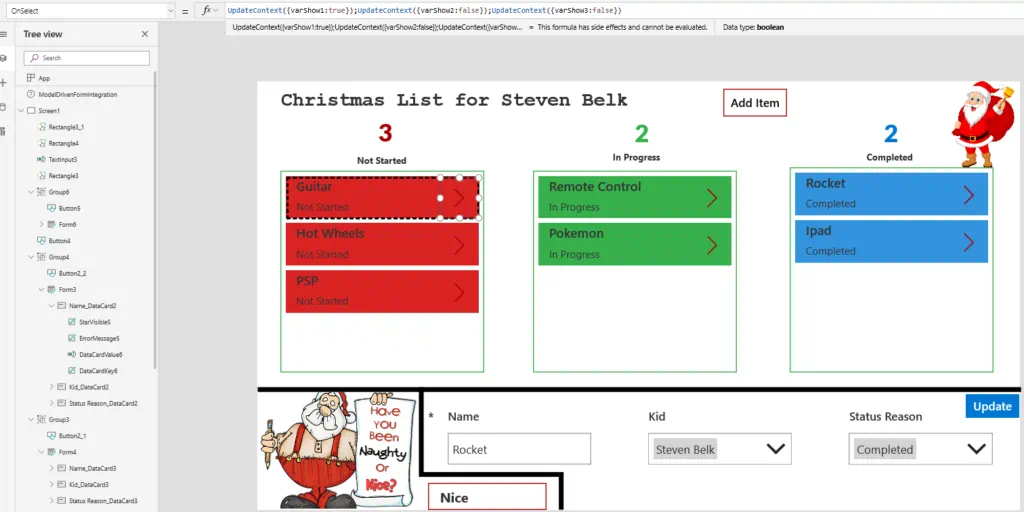
Using a Context Variable in the Visible properties of a form we can easily show/hide and submit different forms when selecting on an item from 3 different galleries. Instead of creating 3 screens to display a form that is tied to a specific gallery we can easily use one screen to show all the galleries and forms.
- First on the form, we need to set the item property to Gallery(name of your gallery).Selected and set the visible property of a form to a Context Variable, varShow1 in my example.
- Next, we need to create a button and set the visible property of the button to varShow1 as well. Also, set the OnSelect property of the button to SubmitForm(Nameofyourform);UpdateContext({varShow1:false})
- Next, we need group the form and button in order to hide and show the form and button at the same. To do this, hold the Control button down on your keyboard select the form and button. When both are selected click on the “…” icon and select group.
- Repeat the steps 1-3 again to create 2 additional galleries, 2 forms, and 2 buttons. Make sure to give a unique name for each context variable for each form/button such as varShow2 and varShow3.
- Next, go back into the gallery and select the “>” icon. Set the OnSelect property to UpdateContext({varShow1:true});UpdateContext({varShow2:false});UpdateContext({varShow3:false})
Note: The updateContext({varShow1:true}) allows the form to be visible based on the selection of the item you select within a gallery, but because there are 3 forms in total, we need to make sure to include in the formula to set the visibility of the other forms to false so only 1 form will show at all times.
In conclusion…
This year, Santa will be able to easily manage and update the toys list for all the nice children around the world from one single location, a model-driven form. Instead of using a classic sub-grid to display a list of related toys, Santa will be able to easily interact with the data more efficiently and most important of all “QUICKLY.” The children are eagerly waiting for Santa to deliver their toys this year!
Are embedded canvas apps on your wish list? Contact Hitachi Solutions today!